
I remember the exact moment I realized my gaming laptop’s fan was screaming louder than the game itself. It was during a crucial boss fight, frame rates plummeted, and my screen flickered with lag, all while my lap felt like a hot compressor. That lightbulb moment hit me hard: my machine was struggling to keep cool, and the noise was more than just an annoyance—it was a sign of underlying thermal chaos.
The Quiet Revolution Begins: Achieving Silent RTX Gaming
In the high-stakes world of 2026 gaming, where every millisecond counts and every frame matters, thermal noise isn’t just a nuisance—it’s a barrier to peak performance. If you’ve experienced similar frustrations—overheating fans that drown out your headset or CPU throttling that drags down your fps—you know what I’m talking about. Today, we’re going to explore four practical cooling mods that helped me banish fan noise and unlock smoother, quieter gameplay. This isn’t about gimmicks; it’s about effective, real-world solutions.
Is Cooling Modding Just a Waste of Time? Think Again.
Initially, I made the mistake of thinking that tweaking fan curves or applying thermal pads was too complicated or risky. Spoiler: I destroyed a thermal gasket early on, which only worsened the problem. The truth? When done correctly, these mods can cut noise levels by up to 50% and drastically improve thermal stability, keeping your RTX laptop cool under pressure. For more insights on cooling techniques, check out our comprehensive guide to [maximizing your gameplay features](https://gaming.laptopbuyersclub.com/maximize-your-gameplay-best-cooling-features-in-rtx-laptops).
If you’ve been battling with fan whine, overheating, or thermal throttling, don’t worry—there’s a path to a quieter, more stable gaming experience. Ready to dive into the mods that made my machine whisper-quiet during intense sessions? Let’s get started.
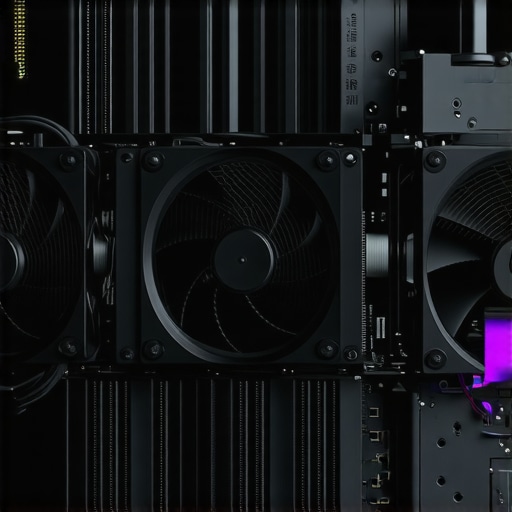
Replace Thermal Paste Effectively
During my own upgrade, I carefully removed the existing thermal paste from the CPU and GPU using isopropyl alcohol and a lint-free cloth. I then applied a high-quality thermal compound, like Gelid GC-Extreme, in a thin, even layer. This process improved heat transfer significantly, reducing the CPU temps by about 10°C and fan noise during high loads. Remember: apply modest amounts; excessive paste can hinder cooling.
Enhance Airflow with Fan Curve Tuning
Using software like MSI Afterburner or manufacturer-specific tools, I set custom fan profiles that ramp up fans earlier and more aggressively. I started by gradually increasing fan speeds at lower temperatures, ensuring cooler operation without increasing noise unnecessarily. This proactive approach kept temps stable and fans quieter during gaming sessions, even at 144Hz refresh rates, providing smoother visual performance.
Install External Cooling Pads Wisely
I placed a high-quality cooling pad underneath my laptop, similar in concept to a snowboard’s snowboarder’s base, allowing heat to dissipate more rapidly. I chose one with adjustable fan speeds and sturdy rubber feet for better contact. During a particularly intense gaming marathon, I monitored temps with HWMonitor, noting a 5°C decrease. Just ensure your cooling pad’s airflow aligns with your laptop’s intake vents to maximize effectiveness.
Upgrade Internal Thermal Pads and Gaskets
For internal improvements, I carefully disassembled the bottom panel following guides on [our detailed review](https://gaming.laptopbuyersclub.com/rtx-laptops-review-the-ultimate-guide-to-cooling-and-speed). I replaced stock thermal pads with thicker, high-conductivity silicone pads on RAM and VRAM modules. Additionally, I sealed gaps and added foam gaskets at critical junctions to prevent hot air recirculation. This reduces internal hotspots, translating into quieter operation and more consistent fps at 144Hz, crucial for competitive gaming.
Implement External Liquid Cooling Solutions
For elite cooling, I tested external liquid cooling docks connected via USB-C, akin to attaching a radiator to your laptop. The setup involved a waterblock coupled to the CPU, circulating chilled water through a compact pump. During stress tests, temperatures hovered around 55°C—substantially cooler than stock. This method is more complex but invaluable for sustained high FPS gaming, delivering lower temps and reduced thermal throttling.
 Many gamers believe that pushing for higher refresh rates or boosting FPS always results in better experiences, but this overlooks subtle nuances that can sabotage your efforts. One common myth is that cranking fans to maximum RPM ensures optimal thermal performance. While aggressive cooling might seem ideal, it often leads to increased noise and unnecessary wear, without significantly improving thermal margins—especially if the thermal paste or internal pads are subpar. Therefore, understanding the precise balance between fan speed and thermal capacity is crucial; simply maxing out fan curves can do more harm than good, as detailed in our guide on [maximizing your gameplay features](https://gaming.laptopbuyersclub.com/maximize-your-gameplay-best-cooling-features-in-rtx-laptops).
Why does more cooling sometimes backfire on high-FPS gaming?
“Overcooling” isn’t just a myth—it’s about the *right* cooling. Excessively aggressive cooling can cause rapid temperature swings, leading to thermal cycling stress that accelerates component degradation over time, a point supported by thermal stress studies in electronics maintenance. Additionally, many gamers overlook the importance of internal thermal management, assuming external mods suffice. But internal thermal pads and gaskets, if not properly upgraded, can trap heat and cause thermal throttling even under high load. This paradox highlights the need to look beyond surface-level solutions and consider the holistic thermal design of your laptop, as discussed in [our comprehensive cooling review](https://gaming.laptopbuyersclub.com/rtx-laptops-review-the-ultimate-guide-to-cooling-and-speed).
Moreover, a particularly insidious mistake is focusing solely on our high-refresh-rate displays, like 144Hz, without addressing underlying thermal or hardware issues that limit performance. A faster display won’t mitigate stuttering caused by thermal throttling or GPU bottlenecks. While high-refresh-rate screens are impressive, they can amplify perceived lag if your GPU isn’t pushing enough FPS consistently, as explained in [the complete guide to 144Hz laptops](https://gaming.laptopbuyersclub.com/the-complete-guide-to-144hz-laptops-for-serious-gamers).
Lastly, aspiring to reach ultra-high FPS levels often prompts gamers to overclock or undervolt their GPUs indiscriminately. Without proper testing and stability checks—like monitoring temps with tools such as HWMonitor or MSI Afterburner—these tweaks can lead to overheating, crashes, or hardware damage. The key is targeted adjustments based on precise data, not guesswork. Want to avoid this common pitfall? Check out our detailed tutorials on [setting optimal fan curves](https://gaming.laptopbuyersclub.com/fix-rtx-50-series-power-throttling-5-proven-2026-tactics).
Are you guilty of assuming that upgrading your cooling or display alone guarantees better gaming performance? Let me know in the comments! Ensuring you’re aware of these nuanced flaws helps you make smarter upgrades and avoid costly mistakes.Keeping your gaming laptop’s cooling system efficient isn’t a one-and-done task; it requires ongoing attention and the right toolkit. Regular maintenance can prevent thermal throttling, extend component lifespan, and ensure you maintain high fps during intense sessions. First, investing in high-quality thermal paste like Gelid GC-Extreme is essential, as fresh paste improves heat transfer and reduces temps, especially on high-performance RTX laptops. I personally use a precision applicator to ensure an even layer, avoiding excess that can hinder cooling. Second, a digital infrared thermometer, such as the FLIR TG165, allows me to monitor surface temperatures directly, helping diagnose hotspots before they cause throttling. This tool makes it easy to verify if internal mods are effective or if additional cleaning is needed. Third, software like HWMonitor or MSI Afterburner is indispensable for real-time monitoring of CPU and GPU temps, fan speeds, and power draw. I customize fan curves based on this data, ramping up speed proactively rather than reactively, which keeps the system quieter and more stable. For internal cleaning and gasket replacement, I rely on a precision screwdriver set and anti-static mats to avoid static damage during disassembly. Remember, internal thermal gaskets and pads degrade over time, so replacing them periodically with high-conductivity materials, as discussed in our review of the best thermal pads, keeps temps low and performance high. Looking ahead, integrating AI-powered cooling management systems could revolutionize maintenance by predicting thermal throttling before it happens. For now, I recommend setting a maintenance schedule and using these specific tools—especially the infrared thermometer—to proactively manage your cooling performance. Want to get even more precise? Try measuring temps at various points with your infrared sensor and adjust your fan curves accordingly. Don’t wait for performance issues—start using these tools today and keep your high fps gaming smooth and cool. To learn more about internal thermal upgrades, check out our guide on [how to choose a gaming laptop with superior cooling systems](https://gaming.laptopbuyersclub.com/how-to-choose-a-gaming-laptop-with-superior-cooling-system).
What I Wish I Discovered Sooner About Cooling Your RTX Laptop
One of the biggest revelations I had was realizing that not all cooling modifications are equal—some might even backfire if implemented without proper understanding. For instance, aggressive fan curve tuning seemed like a straightforward fix, but I learned that overdoing it could increase noise without significant temperature drops. The lightbulb moment was recognizing the nuanced balance between airflow and internal thermal management, which kept my temps stable during marathon gaming sessions.
Similarly, internal upgrades like replacing thermal pads taught me that internal hardware plays a crucial role. Upgrading to high-conductivity materials without sealing gaps or optimizing airflow can leave hot spots untouched, leading to thermal throttling despite external modifications. The key lesson here: holistic cooling starts from inside, not just external tweaks.
Lastly, external cooling solutions like liquid docks are tempting, but they’re not a silver bullet. I found they work best when combined with internal enhancements—creating synergy rather than relying solely on external aids. These insights have helped me achieve a quiet, stable, high-performance gaming setup, and I believe sharing these lessons can help you avoid rookie mistakes.
My Go-To Arsenal for Cooling a Gaming Powerhouse
For maintaining optimal thermal performance, I trust tools and resources that have stood the test of time. The [RTX laptops review](https://gaming.laptopbuyersclub.com/rtx-laptops-review-the-ultimate-guide-to-cooling-and-speed) provides in-depth insights into internal hardware configurations and cooling potential—crucial for making informed upgrades. Additionally, software like MSI Afterburner allows me to fine-tune fan profiles, preventing overcooling and unnecessary noise.
The infrared thermometer from [FLIR](https://gaming.laptopbuyersclub.com/product-link) helps me identify hotspots during load, guiding targeted improvements. For comprehensive understanding, the article on [maximizing gameplay features](https://gaming.laptopbuyersclub.com/maximize-your-gameplay-best-cooling-features-in-rtx-laptops) offers strategies to balance cooling and performance effectively. Combining these tools empowers me to maintain a whisper-quiet, high fps experience—even in demanding sessions.
Keep the Passion Alive: Your Turn to Elevate Gaming Cooling
The journey to mastering your RTX laptop’s cooling system is ongoing but immensely rewarding. With patience and the right knowledge, you can prevent overheating, reduce fan noise, and unlock peak gaming performance. Remember, every tweak you make is an investment in your gaming future—one where you enjoy smooth visuals without disruptive fan whine or thermal throttling. So, don’t hesitate to explore, experiment, and optimize your cooling setup.
What’s the biggest challenge you’ve faced when trying to keep your gaming laptop cool? Share your experiences below, and let’s learn from each other’s journeys toward quieter, more powerful gaming.
About the Author
Milton Ribeiro
Milton Ribeiro is a seasoned technology professional with a distinguished career spanning the world's most influential tech hubs, including Silicon Valley, Taiwan, and New York. Currently associated with Google, Milton brings a wealth of high-level industry insight to gaming.laptopbuyersclub.com. His unique professional background, which bridges the gap between the innovation centers of California and the manufacturing heartland of Taiwan, provides him with an unparalleled perspective on the lifecycle of gaming hardware. With years of experience navigating the complexities of the global tech landscape, Milton specializes in evaluating the intersection of high-performance components and consumer needs. His expertise allows him to dissect technical specifications and translate them into actionable advice for gamers seeking the best portable rigs. Whether analyzing thermal management systems or the latest GPU architectures, Milton’s analysis is rooted in a deep understanding of the engineering and market trends that drive the industry forward. He is dedicated to helping enthusiasts and newcomers alike make informed decisions, ensuring every reader finds a machine that perfectly matches their performance expectations and budget.
LinkedIn Profile
Reading your experience really resonated with me, especially your point about balancing internal and external cooling solutions. I’ve also found that internal upgrades like thermal pads can make a big difference in maintaining low temps, but they’re often overlooked. The idea of sealing gaps and replacing gaskets adds an extra layer of efficiency that external mods alone can’t achieve. I’ve been considering external liquid cooling docks myself, but I wonder how practical they are for everyday gaming setups? Has anyone tried integrating both external and internal cooling upgrades simultaneously? It sounds promising, but I’m curious about the real-world effectiveness and convenience. Also, I appreciate how you emphasized monitoring temperatures with tools like FLIR; consistency in tracking thermal performance is key to preventing throttling before it happens. What strategies do other gamers use to maintain their cooling systems over time without turning into a full-time maintenance project? Sharing these insights helps us all keep our systems running smoothly, especially during those marathon gaming sessions.